Cutaway of the YICS

| Paraphrased from the Yamaha service manual: "The YICS consists of 2 seperate chambers, each connected, by a hose, to a port on each cylnder just behind the intake valve. As the piston moves down on the intake stroke, the cylnder fills with a fresh air/fuel charge. A vacuum is created in the YICS chamber at the same time. When the intake valve closes, part of the charge is drawn into the YICS. When the intake valve reopens the mixture in the YICS shoots back out through an angled tube into the cylinder, mixing with and swirling the main intake charge. The swirling charge is then compressed and ignited, burning more completely and producing more power than that of a conventional engine." |
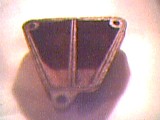
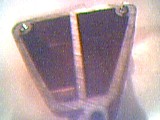
| Diagnosing & repairing the YICS system The YICS can leak in two different ways: internaly or externaly Internal leaks occure when the center section develops a leak along the seam where the front and rear halves are bonded together. (see arrow on the right) This can cause hard starting and engine "hunting" at idle. That is, the RPM slowly rises and falls at idle. External leaks are caused by a failure in the seam around the outside of the YICS, cracks in the chamber, loose or worn hoses. Note that the two top screws have a fiber gasket below the heads, and if they are missing this will also cause a leak. The result is a vacume leak. (See arrows, bottom photo) Testing the YICS Remove the unit from the bike, and remove the ONE screw holding the chrome cover on. Don't remove the other 2 screws, as this will cause a leak. (NOTE '82 models only) Attach a 3 or 4 inch length of hose to each port. blow in each hose, you should not have air comming out anywhere, & should feel resistance. If you have air comming out the other hose, the YICS is leaking internaly. To check for an external leak,, plug one hose and submerge the unit in water. blow in the open hose & watch for bubbles. if so, there's your leak. repeat the test for the other chamber by switching the hose. Repairing the YICS If the leak is external, it is a relativly simple task of mixing up some 2 part epoxy, and sealing the leak. >Hobby epoxy sold in hobby shops, (where else?) is a clear, brushable 2 part epoxy that is fuel proof, & used on gas remote control boats. Internal leaks require a bit more work, but nothing too difficult, just a little patience, & access to a good band saw. Working slowly and carefully cut the unit in half ALONG THE SEAM (as shown in the pictures above) The point here is to get as straight & neat a cut as you can. Remove any carbon and "flashing" produced by the cutting. Be careful, the plastic is relativly soft. Next, get some gasket material, avalable at any auto parts store. You want to get the blue/black stuff that comes in a sheet, not cork. and some RED silicone sealer. The red sealer is fuel proof. Using the YICS as a template, cut out a gasket , making sure that the internal seam is fully covered. I think its obvious that you need to leave the middle sections open. Coat both halves of the YICS with a THIN layer of sealer, apply the gasket, and screw the unit back together. Dont forget the seals on the 2 screws ('82 only), Rubber o-rings used for auto air conditioning systems are a suitable replacement. Allow the unit to dry overnight, and your all set. mount it back up, (use new hoses, they take a beating) and go for a ride! :) |